
티스토리 뷰
django restframework에서 제공하는 Token을 사용해 User api를 만들어 회원관리를 해봅시다!
이전에는 simple-jwt를 활용해 JWT를 활용하는 로그인 api를 생성한 적이 있다. 지금은 사용자가 사용할 기능을 생각해봤을때, token 발생후 원할 때만 선택적으로 logout을 해주는게 사용자의 만족도를 높일 것 같아 DRF에서 제공하는 기본적인 Token을 활용해 회원관리 api를 생성하였다.
0. setting(settings.py)
INSTALLED_APPS = [
    'django.contrib.admin',
    'django.contrib.auth',
    'django.contrib.contenttypes',
    'django.contrib.sessions',
    'django.contrib.messages',
    'django.contrib.staticfiles',
    'corsheaders',
    'rest_framework', # restframework 등록
    'rest_framework.authtoken',# authtoken 등록
    'Account', # api를 관리할 app Account 등록
    'phonenumber_field',

]

RESTFRAMEWORK = {
	'DEFAULT_AUTHENTICATION_CLASSES': [
        'rest_framework.authentication.TokenAuthentication',
    ],
}
#user의 권한 혹은 정보를 확인할 때, token을 사용하려면, TokenAuthentication을 등록
1. signup(회원가입)
회원가입의 경우, 장고에서 제공하는 회원관리 모델인 User를 사용한다.
- Profile class를 만들어 user, qrcode, address, phoneNumber를 회원가입시 입력받도록한다.
class Profile(models.Model):
    user = models.OneToOneField(User, on_delete=models.CASCADE)
    qrcode = models.TextField(max_length=255)
    address = models.URLField(max_length=255)
    PhoneNumber = PhoneNumberField(null = True,blank = False, unique = True)
이때, user는 User model을 사용하고 Profile에서 user_id를 통해 역참조가 가능하도록 OneToOneField를 사용한다.
- APIView를 사용해 class기반의 api를 생성한다. (회원가입은 폼을 입력받기만 하면 되기에 post)
class SignupView(APIView):
    def post(self, request):
        user = User.objects.create_user(
            username=request.data['name'],
            password=request.data['password'])
        profile = models.Profile(user=user)

        user.save()
        profile.save()
        return Response({"name": request.data['name']})
이때, User model을 활용해 name과 password를 입력받고 profile에도 입력받은 user정보를 저장한다.
profile model에 address or PhoneNumber or qrcode 등의 정보 역시 입력가능하지만, api가 잘 작동하는지만 확인하기 위해 간략히 작성한다.
object와 json의 자유자재 변환을 위해 serializers.py를 작성할 예정이지만, 지금은 기본적인 틀만 구성해본다.(생략)
- postman을 사용해서 DB에 잘 저장되는지 확인한다.

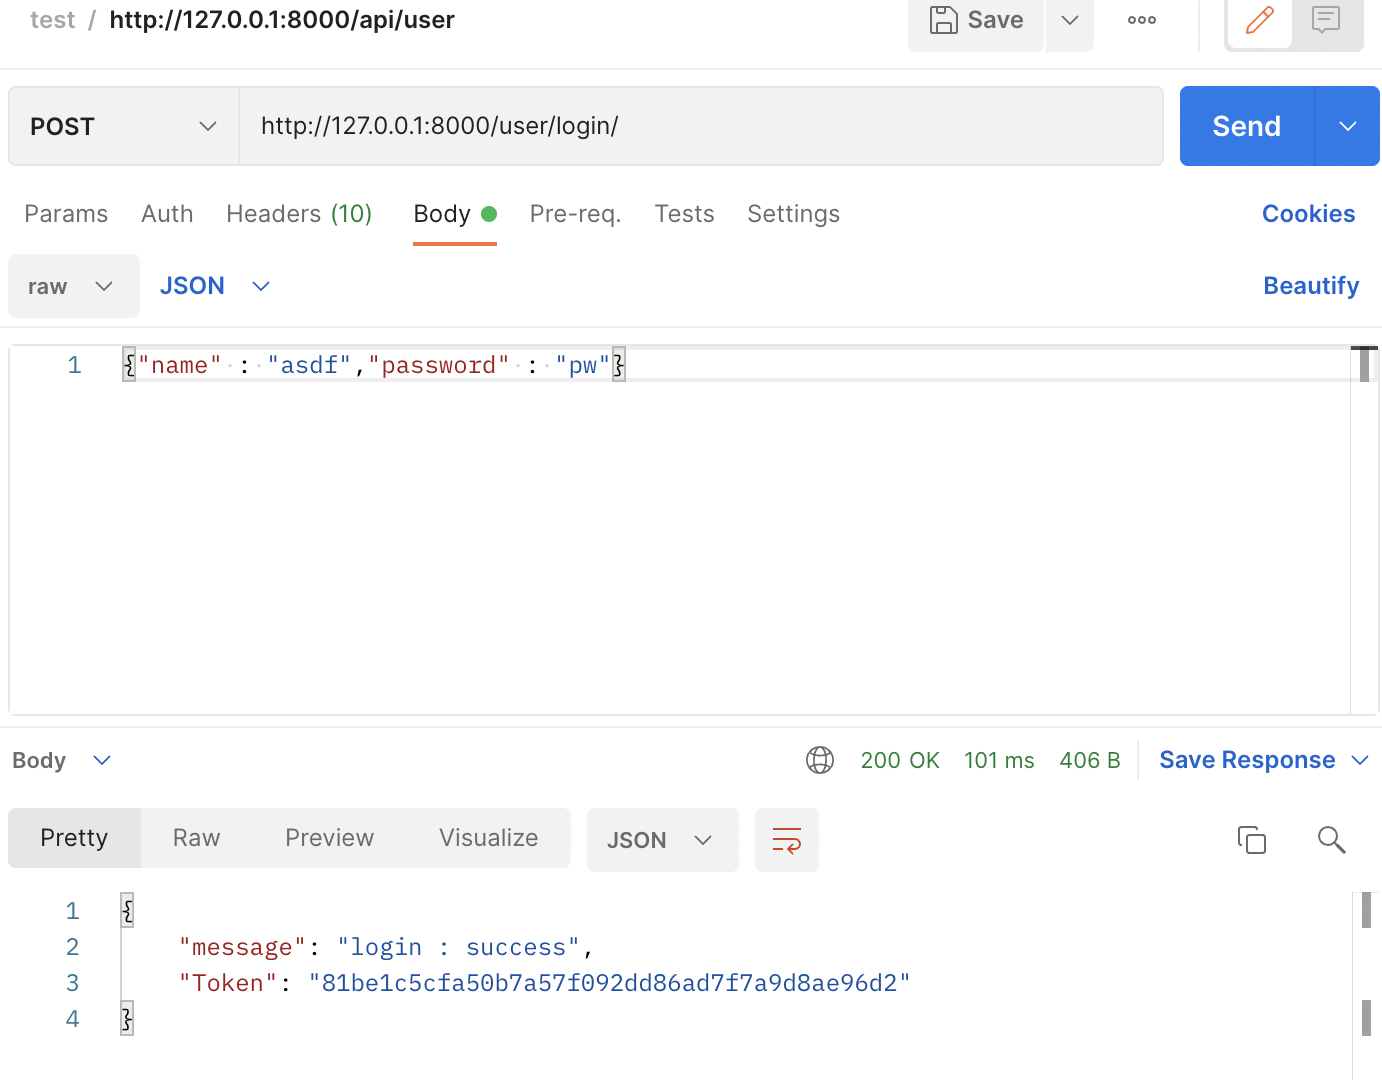
2. login(로그인) : 토큰생성
- login시 token을 발행한다.
class LoginView(APIView):
def post(self, request):
user = authenticate(username=request.data['name'], password=request.data['password'])
if user is not None:
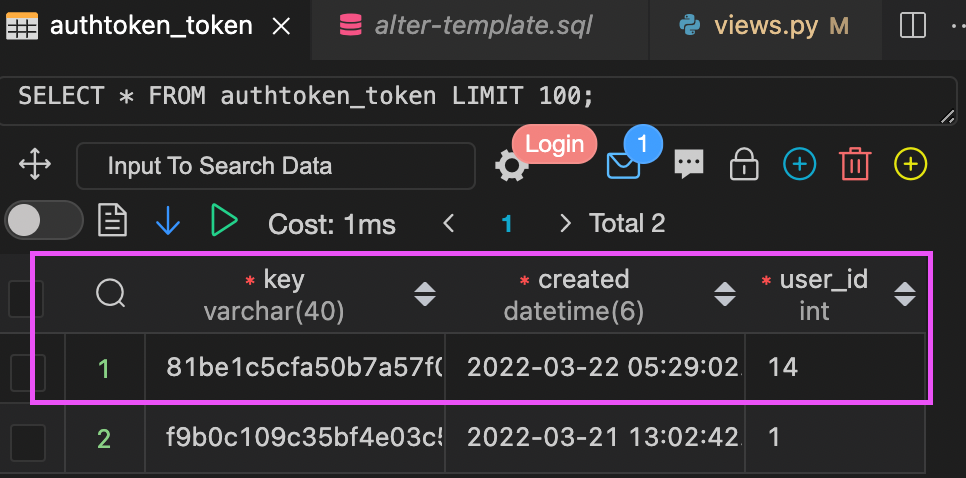
token = Token.objects.create(user=user)
return Response({
"message": "login : success",
"Token": token.key})
else:
return Response(status=401)1. authentication을 활용해 회원가입이 되어있는 user 정보를 불러오고 user에 저장한다.
2. 만약 데이터가 존재한다면(회원가입이 되어있다면) 토큰을 발행하고 토큰을 response한다.
- postman을 통해 확인한다.
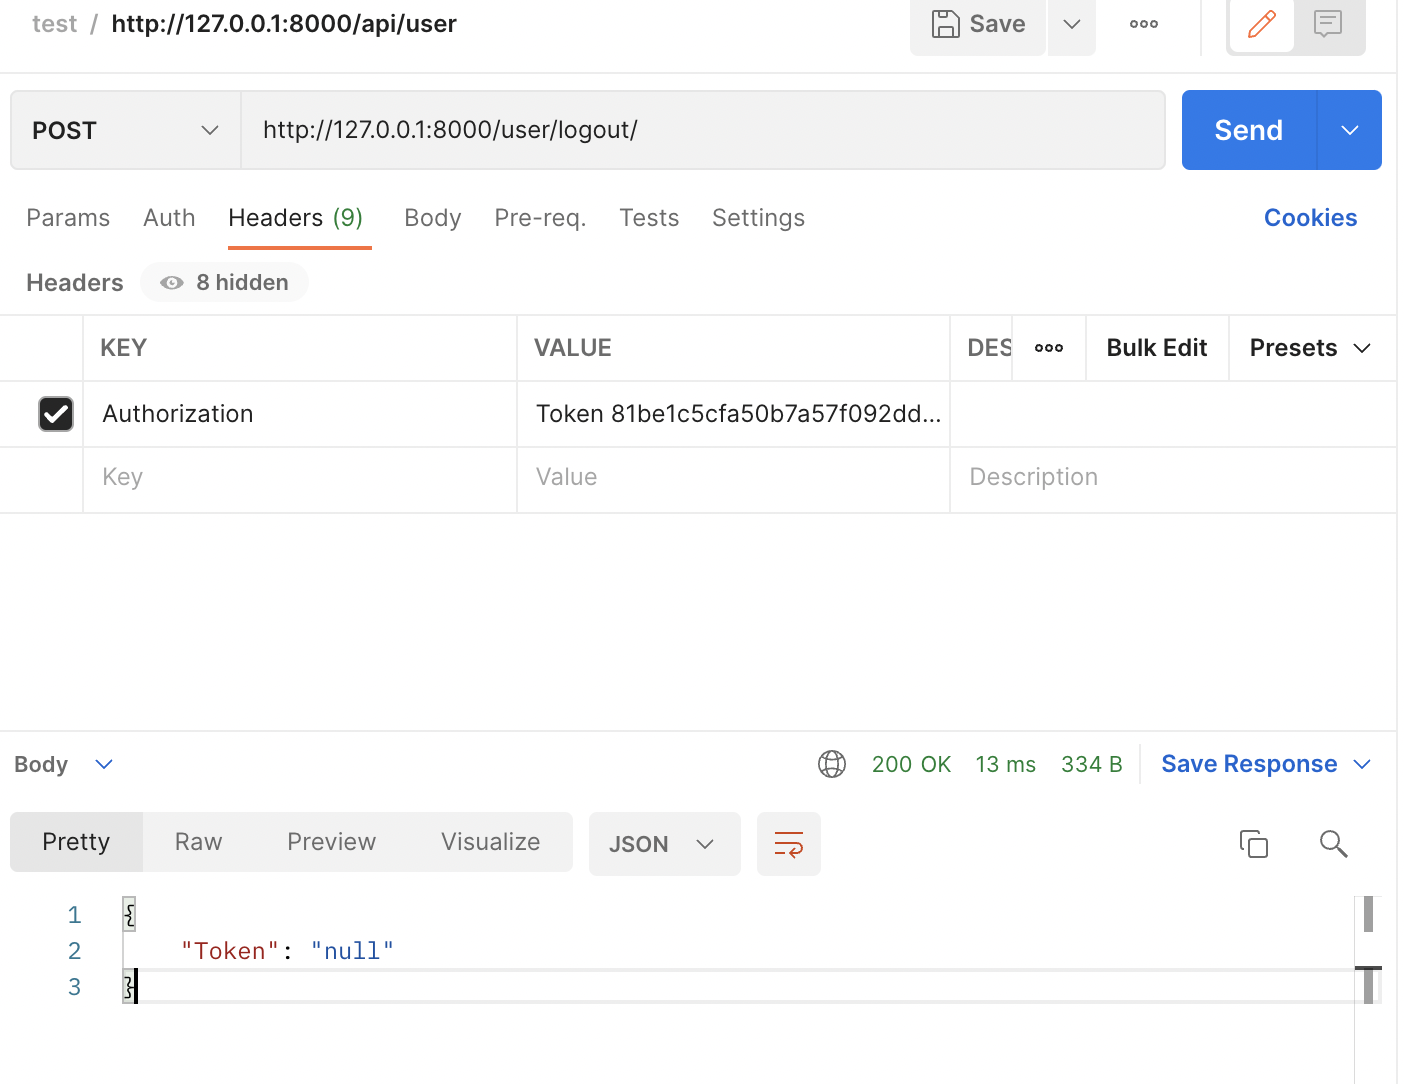
3. logout(로그아웃) 토큰제거
- token을 활용한 user logout api 생성
class LogoutView(APIView):
authentication_classes = [TokenAuthentication]
# TokenAuthentication을 통해 Token으로 User를 구분
permission_classes = [IsAuthenticated]
# 로그인한 사람만 접근이 가능.
def post(self, request):
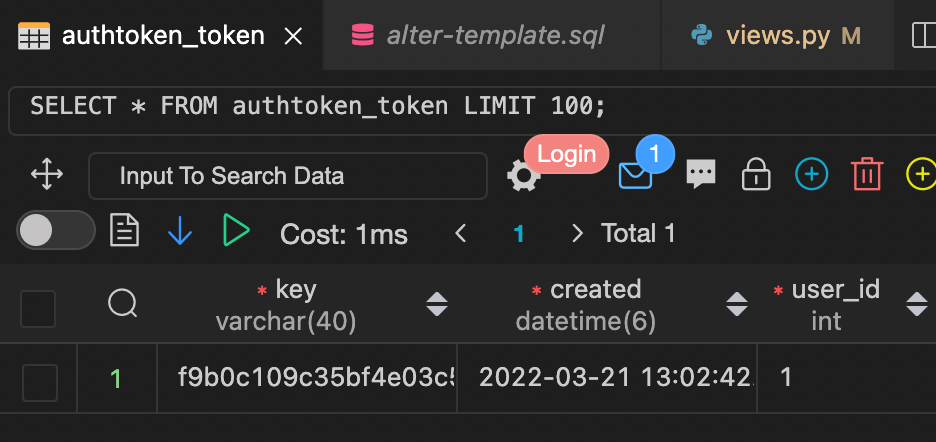
token = Token.objects.get(user=request.user)
token.delete()
#토큰을 제거
return Response({"Token": "null"})login시 token을 지워주는 방식으로 진행하던중, stackoverflow로 해답발견
Token Authentication for RESTful API: should the token be periodically changed?
I'm building a RESTful API with Django and django-rest-framework. As authentication mechanism we have chosen "Token Authentication" and I have already implemented it following Django-REST-Framewor...
stackoverflow.com
필요한 사람들은 simplejwt처럼 login token 만료 시간을 설정하고 싶다면 참고하기!
- postman으로 확인
header에 token을 Authorization Token [token 데이터값]을 함께 넣어줌으로써 user를 token으로 구분후, logout!
이렇게 회원관리 api를 생성해봤다! 이제 token을 활용해서 token을 header에 포함하여 넘기며 login상태를 체크하여 페이지마다 회원별 서비스를 제공하거나 특정 데이터를 제공하는 서비스를 만들어 웹페이지의 authentication을 사용할 수 있다.


- Total
- Today
- Yesterday
- 시뮬레이션 c
- 4963 섬의개수
- 핀테크 트렌드
- 딥러닝입문
- CREATE ASSERTION
- 기사작성 대외활동
- 온라인프로필 만들기
- mm1queue
- 영화 리뷰 긍정 부정 분류
- 모듈 사용법
- DRF 회원관리
- 10866 백준
- 11053 백준
- 효율적인방법찾기
- 백준 10866
- 코딩월드뉴스
- 스택 파이썬
- c++덱
- 백준 15650 파이썬
- 백준 4963
- 소프트웨어공학설계
- 기본 텍스트 분류
- LAMBDA
- CSMA/CD란?
- 백준 숫자놀이
- 파이썬 알아두면 유용
- 백트래킹(1)
- 13886
- stack 컨테이너
- 백준 11053 파이썬
| 일 | 월 | 화 | 수 | 목 | 금 | 토 |
|---|---|---|---|---|---|---|
| 1 | 2 | |||||
| 3 | 4 | 5 | 6 | 7 | 8 | 9 |
| 10 | 11 | 12 | 13 | 14 | 15 | 16 |
| 17 | 18 | 19 | 20 | 21 | 22 | 23 |
| 24 | 25 | 26 | 27 | 28 | 29 | 30 |
| 31 |